Hopecraft prototype

How it works — the six steps
How it works

  1. Find your house. Type its postcode.
  2. Confirm it. Not yours? Tap your roof on the map.
  3. Pick a project. An extension, or solar panels on the roof. Others wait behind "More projects".
  4. Design it. Pick a size and drag it into place; the ↶ button undoes.
  5. Check the costs. The cost, the planning read and the winter sun.
  6. Send your brief. To a builder, or save it as a PDF.
More tips
Free during the pilot · no account needed

See it on your actual house.

Sketch an extension or solar panels on your home, or a house you're looking at, in 3D.

    No postcode handy? or
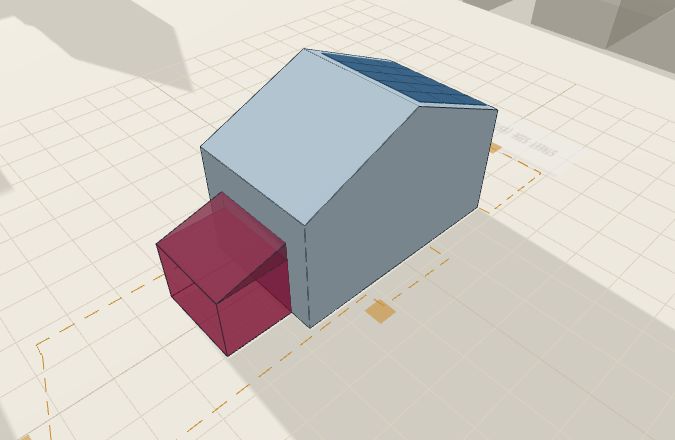
    Hopecraft's 3D model of its example house, a real house in Southam, with an extension drawn on the back, solar panels on the roof and the shadows at noon on 21 December
    Contains OS data © Crown copyright and database rights 2026 · plot outline © Crown copyright, HM Land Registry and Ordnance Survey (OGL) · streets © OpenStreetMap contributors

    Built on Ordnance Survey measurements · Planning checks for England · Builders joining in Warwickshire

    How big is it really?e.g. 4m × 3.1m × 3.8m to the top
    Will I need permission?Rule of thumb, not legal advice
    Roughly what will it cost?A range, never one number
    Will it upset next door?The real sun for your postcode
    Is this the house? Check the shape and where it sits — your home today, or one you're hoping to buy. If it's a neighbour's, use "Not this house" under the model and tap the right roof on the map. Next comes where the magic happens — your extension or solar panels, drawn on the real thing.

    Your house

    01 · MASSING MODEL
    Is this the one? We matched the nearest building to your postcode.
    Building data © OpenStreetMap contributors · Privacy
    existing house proposed addition solar array patio / decking pool pond hot tub estimated plot boundary street side (estimated) neighbouring buildings

    What are you dreaming of?

    Change the house
    Add something in the garden
    Energy
    Inside

    Design tools

    02 · OVERLAY

    Add to the house

    Change the house
    Add something in the garden
    Energy
    Pick one and shape it, then press the green Add it to the house — or simply pick the next thing: anything you have shaped is added for you, and undo takes it back. Everything added can be dragged on the model.

    On the house

    None added yet.
    How's it feeling so far?

    Compare two versions

    Save this as A, change it and save as B. Then compare the two side by side.

    About your house

    Colours and finishes

    More options

    Where the numbers come from

    01c · SURVEY
    Where the numbers come from
    —
    Footprint
    —
    Height / floors
    —
    Roof shape
    —
    Estimated plot size (dashed line — not a legal boundary)
    —
    Building data source
    —
    Solar potential —
    Roof aspect
    —
    Solar feasibility
    —
    Panels that could fit
    —
    System size
    —
    Est. annual generation
    —
    Est. install cost
    —
    Est. annual savings
    —
    Est. payback
    —
    Rough estimate, not a quote — assumes 400W panels (1.0m × 1.6m), £1,800/kWp installed, and values the electricity at the Ofgem cap for the share used at home and the open export rate for the rest. Add solar at the Design step for the detail: roof yield, inverter, battery and charger.

    See it for real

    03 · AI RENDER
    See it for real

    1. Add a photo of your house  ·  2. Tap Generate  ·  3. See the design photo-real, in the visual panel above

    Add a photo of your house
    Love the look?
    Opens straight into your camera. Stand where it would go.
    What the house is made of
    Create the render yourself — free

    Automatic rendering is switched off. You can still produce the same image by hand in about a minute, using any AI image tool — the Gemini app's free allowance is plenty. Everything below is exactly what the app would have sent.

    1. Download the reference images. Your photo, plus a wireframe of the 3D model so the proportions and placement stay true to scale.
    2. Copy the instruction and run it. Open your image tool, attach both images, and paste this.
    3. Bring the finished image back. It then works exactly like an automatic render — before/after share card and the builder's brief included.

    Check the image against your photo before sharing it — AI tools change details you didn't ask them to. It's a concept to discuss, not a finished result.

    Project brief

    04 · EXPORT

    What a builder you choose gets:

    How much do you love it?

    Give a budget and timing at Costs and the link and the brief carry them.

    How sending works
    Send goes to a builder you choose. Matched local quotes are not switched on yet. Send opens your phone's share sheet (WhatsApp, email) with a link that opens this exact design. The Warwickshire pilot's trades are being vetted, and this page will say so the day matching is on. The PDF uses your device's print dialog — on an iPhone that's Share → Print, then pinch the preview to turn it into a PDF you can save. The link carries the design, the postcode and the house's map position, so share it only with people you would show the house to.
    More options
    The brief as data (JSON)